Questions about Internet
Get answers to your questions about email, fiber internet, My Alliance WiFi app, and more. Can’t find the answer you’re looking for? Contact our support team.
What is the DMCA?
The Digital Millenium Copyright Act (DMCA) is a law that was passed on October 12, 1998. Among other things, this law specifically addresses the use of the Internet to illegally reproduce or disseminate copyrighted material. To learn more about the DMCA, you can click here.
Copyright Violators ID?
When a copyright holder contacts Alliance Communications, they send us the name of the material that is being infringed upon, the time that the material was being made available online, as well as the public IP address of the computer or network that is sharing it. Since public IP addresses are unique, and can only be used on one device at a time, they act much like a fingerprint. To be in compliance with the law, Alliance uses this information to identify and contact the party responsible.
Copyright Infringement Notice?
If you have received a copyright infringement notice from Alliance Communications via e-mail or registered letter, this means that a computer on your network is making copyrighted material publicly available without the consent of the copyright holder.
In layman’s terms, there is a computer on your network that is sharing movies, music, software, or some other form of media, probably through a peer-to-peer torrent program such as uTorrent or Bit Torrent. The copyright holder has notified Alliance of this, and we are legally required to notified you.
Using your Alliance Internet connection to download or distribute copyrighted material illegally is a violation of our acceptable use policy and can result in suspension or termination of services.
Service Restoration?
If your service has been suspended for copyright infringement, this means that you have received two notices via e-mail and a registered letter from our office. Since these notices were sent, we have continued to receive complaints from a copyright holder alleging that you are in violation of the Digital Millenium Copyright Act.
To get your service turned back on, you will need to complete a DMCA counter-notice form and submit it to Alliance Communications either in person or via fax or email. Once this notice has been received, Alliance will un-suspend your Internet service.
Please note that any further complaints regarding copyright violations will result in re-suspension of service or possible service termination.
DMCA designated agent?
| Name: | DMCA Group |
| E-mail: | dmca@alliancecom.net |
| Phone: | 605.594.3411 |
Email away from home
You can access your webmail in two different ways:
- Type in the address http://webmail.alliancecom.net in your browser window and hit enter. In the Webmail box, type in your e-mail address and password. Open, read, save or delete messages, just as you would on your home computer.
- Click on the Webmail Login tab at the top of the Alliance Web site. This link will take you to the Alliance webmail login.
Email phishing scams
In the past several months, numerous emails have been sent to Alliance customers, purporting to be from Alliance Communications. The subject lines of these emails are usually something to the effect of “Alliance Customer Care”, “Dear Alliancecom Account Subscriber”, “Confirm your Alliancecom.net Webmail Account to Avoid Closure”, “Dear Valuable Customer”, etc. The messages ostensibly come from “Alliance Internet Support”, “Alliance System Support”, “Alliancecom.net Support Team”, or some other variation. The content of these messages usually warns of a variety of webmail account problems the recipient will encounter if they do not promptly reply:
- Compromised accounts are being restricted
- Account deletion is being conducted in preparation for a system upgrade
- Unused accounts are being deleted
- Mailbox storage limit has been reached
- Accounts are being migrated to a new system
- A maintenance process to fight spam is being conducted
- Webmail is being upgraded
These emails are referred to as a phishing scheme, which can be defined as an attempt by someone to gain access to personal information that they should not have. In the case of this particular scheme, the sender is targeting ISPs like Alliance, and they are asking the recipient to either reply to the message the his/her email username or password.
Do not respond to these emails, as they are not legitimate.. The best course of action when you receive such an email is to delete it.
Ways to spot these fraudulent phishing attempts include:
- Broken English
- Bad grammar
- Numerous typos
- Messages are not directly addressed to the recipient
- Links in the email contain alliancecom.net on the end, but have other elements that don’t look quite right: e.g.http://www.somephishingguy.ru/email/alliancecom.net
- Emails with FROM: addresses or URLs with hostnames ending in foreign countries or non-AllianceCom.net addressees:
e.g. Alliance Support [ viktorb@kgb.ru], Internet Team [ igor@cialis4u.bg], Alliance Web Support Team [support@alliancecom.gnic.fr], etc.
Also, if you subscribe to the Alliance Communications Spam and Virus Filter, these messages will be quarantined. If you receive a message in your quarantine, purporting to be from Alliance Communications, disregard it. All email correspondence sent by Alliance Communications to its customers is not filtered by the Spam and Virus firewall. These messages should be treated like any other spam message and deleted. Whether you subscribe to the Spam and Virus filter or not, always remember that Alliance Communications never solicits account information from its customers via email.
Here is an example of a recent phishing e-mail:
From: Alliancecom Internet [mailto: helpdesk@alliancecom.net]
Sent: Monday, September 13, 2010 12:01 PM
Subject: Alliancecom Important InformationAnnouncements
Your ticket has been assigned an ID of [alliancecom.net #788818].
************************************************************************
We will be conducting our regularly scheduled maintenance, to ensure that we provide the highest quality in Internet connectivity and services to customers. Your connectivity and services with us may be interrupted for short periods during the maintenance window. We will also ensure minimal disruption to services where possible.In order to enable us perform quality maintenance on your Internet access and e-mail service, please you must reply to this e-mail message confirming your Alliancecom webmail account details with us.
Do confirm your account details below.
*******************************************
1. First Name & Last Name:
2. Full User Email Address:
3. Password:
4. Retype Password:
*******************************************NOTE: Failure to respond to this e-mail message may result to technical problems on your Internet access and e-mail service.
Thanks for your understanding, we wish you a pleasant day ahead.
**************************************************************************
Email Server Settings
The e-mail server settings are listed below:
Incoming Mail (POP3): pop.alliancecom.net
-Port:110
Incoming Mail (IMAP): imap.alliancecom.net
-Port: 143
Outgoing Mail (SMTP): smtp.alliancecom.net
-Port: 465
-Security: SSL
-Authentication: email address/password (Required) (Case Sensitive)
If you have any questions, dial 611 from any phone with Alliance service or (605) 582-6311 from your cell phone.
Email when traveling
If you are traveling outside of the Alliance service area and find that you cannot send email, the local ISP is probably blocking outgoing email on port 25 (the standard SMTP email port). Many ISPs do this to prevent infected customer computers from sending email out from their network.
To get around this problem, open your email settings and edit the outgoing server configuration. You will need to enableSSL encryption on the outgoing connection and change the port number from 25 to 465. These settings can usually be found in the advanced settings (or MORE SETTINGS, in the case of Microsoft Outlook).
If this fails to resolve the problem, then the ISP does not allow any outgoing email that is not from their email servers, or a firewall is blocking the connection to the server. The next best solution would be to log into Alliance webmail and use that service to send and receive emails while traveling. The address is http://webmail.alliancecom.net. Simply log in with your Alliance email address and password.
New password
To change your password, you may contact our office during business hours by dialing 611 from any phone with Alliance service or call 605-594-3411. In addition, if you go to https://webmail.alliancecom.net while you are in Alliance’s territory, you can change it from there as well.
Secure email
To set up secure e-mail, your e-mail program must support it. Please consult the documentation for your e-mail program for support and setup information. To send and receive e-mail securely via your Alliance e-mail account, use the following settings:
Outgoing Mail Server: smtp.alliancecom.net
Incoming Server (POP3) SSL Port Number: 995
Outgoing Server (SMTP) SSL Port Number: 465
Setup Email for Android
- Go to your “Apps” and choose the “Settings” icon
- Scroll down to the “Accounts” section and choose “Email”
- At the bottom of the page in the “Common Settings” section choose “Settings”
- Choose the “+” symbol at the top right of the page
- Choose”Others” for the account
- Type in your email address (example: jdoe@alliancecom.net) and your email password (Case Sensitive). Then choose “Manual Setup” at the bottom left.
- Choose POP3 Account
- All of your incoming setting should automatically populate. Please verify at the bottom how you want your deletion of emails to be handled (In this case it is set to never delete from server). Click Next.
- Please Verify that the outgoing server settings match the following settings:
SMTP Server: smtp.alliancecom.net
Security Type: SSL (Accept all certificates)
Port: 465
Require Sign in: Make sure box is checked
Username: enter your e-mail address (Case Sensitive)
Password: enter your password (Case Sensitive)
Choose Next - Choose the Sync Schedule you prefer (We recommend the most frequent setting which is 15 minutes in this case). Click next in the lower right.
- Here you will have the option to name the email account and choose what name will display on your outgoing messages. Click “Next” in the lower right when finished.
- Choose “Done with Accounts”
Setup Email for Apple Mail
- Below are the instructions for setting up an Alliance email address on the Macintosh email program. Click on any of the pictures to enlarge them. Click outside of the picture to return them to normal size.
- Start the Apple Mail program
- Choose “Add Other Mail Account” and click “Continue”
- Enter your Full Name, Email Address, Password (Case Sensitive), and then click “Create”
- Mac Mail will then tell you that the account must be manually configured. Click “Next”
- Enter the following Incoming Mail Server Info:Account Type: POP
Mail Server: pop.alliancecom.net
Username: full e-mail address (Case Sensitive)
Password: (Case Sensitive)Click on the “Next” button - Enter the following Outgoing Mail Server Info:SMTP Server: smtp.alliancecom.net
Username: full e-mail address (Case Sensitive)
Password: NOTE: OUR SERVER REQUIRES AUTHENTICATION SO THESE BOXES ARE NOT OPTIONAL EVEN THOUGH THE PROGRAM MAY SAY IT IS Click on the “Create” button - Mac Mail will tell you “Additional Account Information Required”. Click “Next”
- Please change the SMTP Server info to match the settings below exactly
-Port: 465
-SSL: Checked
-Authentication: Password
-Click Create - Your Account should now be setup and ready to use
Setup Email for iPad/iPhone/Mac
Setting up email in an iOS Apple device involves the following steps.
- Verify that your device has Internet access before continuing.
- In your device, tap the Settings button.
- In the device settings window, tap Apps (or tap “Mail” or “Mail, Contacts, Calendars” for older iOS software). Scroll down and select Mail.
- Tap Mail Accounts.
- Tap Add Account.
- From the list of email types, tap Other.
- Under the Mail field, tap Add Mail Account.
- In the New Account window, type in your name, Alliance email address and password (Case Sensitive). The description field should be filled already. Click Next.
- When asked to specify either IMAP or POP3, choose POP3. For the incoming mail server host name, enter pop.alliancecom.net, along with your email address and password (Case Sensitive). For the outgoing mail server host name, enter smtp.alliancecom.net, along with your email address and password (Case Sensitive). Note that this step is not optional. Click Save
- After the email setup returns you to the settings page, please choose your alliancecom account you just created under the Accounts section
- Under the Outgoing Mail Server click on the SMTP section
- Click on the smtp.alliancecom.net underneath the Primary Section (If your Primary Server is empty, click on the smtp.alliancecom.net server listed under the “others” section)
- Verify that the server is turned on by making sure the toggle bar is green. Next, verify that your outgoing server settings match the settings below and then choose Done:
Host Name: smtp.alliancecom.net
User Name: (Case Sensitive)
Password: Required (Case Sensitive)
Use SSL : On (toggle bar is green)
Authentication: Password
Server Port: Change to 465 - At this point your email should be set up. Go back to your main screen and choose your mail envelope to start using your account.
Setup Email for Kindle Fire
|
1. Choose the default mail application from the list of applications.
|
|
 |
2. Choose Other. |
 |
3. Type in the email address and password of your Alliance e-mail address. 4. Click Next.
|
 |
5. Select the protocol you would like to use: POP3 or IMAP. |
 |
6. Type in the Incoming server settings:
7. Click Next. |
 |
8. Type in the Outgoing server settings:
9. Click Next. |
 |
10. Select Folder poll frequency. 11. Click Next. |
 |
12. Specify the display name and account name. 13. Click View your Inbox. |
Setup Email for Mozilla Thunderbird
- Open Thunderbird, and choose Create a new Account.
- Choose “Skip this and use my existing e-mail”
- Type in your Name, full e-mail address, and your password (Case Sensitive) and choose continue (it is your personal preference to leave the remember password box checked or unchecked)
- Choose Manual Config
- Copy the server settings in the picture below
- Incoming Settings:
Choose POP3 for Incoming.
Type in pop.alliancecom.net into the server hostname
Choose Port 110
Choose STARTTLS
Choose Normal Password
Enter your username: full e-mail address (Case Sensitive) - Outgoing Settings:
Type in smtp.alliancecom.net for the server hostname
Choose port 465
Choose SSL/TLS under the SSL section
Choose Normal Password
Enter your username: full e-mail address (Case Sensitive) - Click Done. Thunderbird should now be setup and ready for use.
Setup Email for Windows 10
- Click the “Windows” button in the lower left and choose the “MAIL” application button on your screen
- Click the “Get Started” button
- Click the “Add Account” button
- Click on the Scroll bar on the right side and scroll down until you see “Advanced Setup” Click “Advanced Setup”
- Click on “Internet email”
- Type in your Account Name(email address), Your Name, Incoming Server(pop.alliancecom.net), and choose Account Type (POP3) . Then click the scroll bar on the right and scroll down to the other settings
- After scrolling down, type in your e-mail address, enter your password, and enter the outgoing SMTP mail server (smtp.alliancecom.net) Continue scrolling down for more settings
- Verify that “Outgoing Server requires authentication”, “Use the same user name and password for sending mail”, and “Require SSL for outgoing email” are all checked and then click Sign-in
- Choose Done on the “All done!” window
- Click “Ready to go”
- Your Windows 10 Mail application will open up and you will be ready to send/receive alliancecom emails
Add Email in Windows 10
- Click the “Windows” button in the lower left and choose the “MAIL” application button on your screen
- After Mail opens, click the “Settings” Icon in the lower left corner
- Next, Click “Accounts” in the top right corner of your screen
- Next, click “Add account”
- Click on the Scroll bar on the right side and scroll down until you see “Advanced Setup” Click “Advanced Setup”
- Click on “Internet email”
- Type in your Account Name(email address), Your Name, Incoming Server(pop.alliancecom.net), and choose Account Type (POP3) . Then click the scroll bar on the right and scroll down to the other settings
- After scrolling down, type in your e-mail address, enter your password, and enter the outgoing SMTP mail server (smtp.alliancecom.net) Continue scrolling down for more settings
- Verify that “Outgoing Server requires authentication”, “Use the same user name and password for sending mail”, and “Require SSL for outgoing email” are all checked and then click Sign-in
- Choose Done on the “All done!” window
- Click “Ready to go”
- Your Windows 10 Mail application will open up and you will be ready to send/receive alliancecom emails.
Setup Outlook 2016
Below are the instructions for setting up an Alliance email address in Outlook 2013.
- Start Outlook. On the FILE tab, click INFO and then ADD ACCOUNT.
- In the Welcome to Outlook window, enter your e-mail address, and then click on LET ME SET UP MY ACCOUNT MANUALLY, click CONNECT.
- When asked to choose an E-mail service, click POP OR IMAP and then click NEXT
- The Internet E-mail Settings window will appear. Here, enter the following information:-> Enter your name and Alliance email address
-> If you chose a POP Account, put in pop.alliancecom.net as Incoming mail server.
-> If you chose an IMAP Account put in imap.alliancecom.net as Incoming mail server.
-> Under Incoming Mail Server for Encryption method choose STARTTLS
-> Outgoing Mail Server for both POP and IMAP is smtp.alliancecom.net, and use SSL/TLS for Encryption method. Click CONNECT. - Outlook will ask for your e-mail password, then click CONNECT.
- After the account is setup, open up ACCOUNT SETTINGS, click on your e-mail account and click CHANGE. Then click on MORE SETTINGS, click on the OUTGOING SERVER tab. Check the box labeled My Outgoing Server (SMTP) Requires Authentication. Make sure that it is set to Use Same Settings as My Incoming Mail Server.
- Next, click on the ADVANCED tab. Verify that 465 is in the “Outgoing Server (SMTP) box. Also, verify that SSL is in the “Use the following type of encrypted connection”. Click OK when done.
- Click NEXT and Outlook will test your settings. If all of the tests pass, click FINISH to complete the setup. If a test fails, go back and double-check your settings for spelling errors. Also look for spaces at the beginning or end of the username and password.
Spam Filter Tips
Follow these steps to manage your spam filter if you use an alliancecom.net email address. Even if you use a program like Outlook, Apple Mail, Thunderbird or others for your email, you should manage your spam filter at spam.alliancecom.net to achieve the best results.
Step 1. Go to spam.alliancecom.net and login using your email address and password.
Step 2. Click on the Policies tab.
Step 3. In Filter by Sender, find the Enemies section.
Step 4. If you want to filter ALL messages from a company, not just a single email address, enter the domain name into the Enemies box. The domain is the portion that comes after the @ symbol. Then hit the green + button.
- In the example below, entering badguys.com into the Enemies section will block all messages from email addresses that contain badguys.com.
- Entering bounce5585464131@badguys.com into the Enemies section will only block messages specifically from bounce5585464131@badguys.com. Spammers are smart. They change email addresses often to bypass spam filters. If you enter a specific email address instead of the domain name, you’ll probably still receive spam from the company.
- Important: Make sure you don’t accidentally add spammers into your Friends section.

If you need additional help, don’t hesitate to contact us. Dial 611 from any phone with Alliance service of (605) 582-6311.
Spam Filter User Guide
PRINTABLE VERSION
Login

To log in, enter your full email address and password and click Login button.
2-factor login

If you have 2-factor authentication enabled, it will ask you for your code.
(On first login you will not have this prompt. How to setup 2-factor is listed below)
Managing Quarantine Email
Go to Quarantine > Manage Quarantine. Use Search Filters and Display Settings to manage the list of emails in quarantine.

Messages will reside in quarantine for 30 days after that they are deleted from quarantine.
The following actions can be performed on email in quarantine:
View Message
Click any message in quarantine to view it in a separate window. Click on one of the four tabs to view more information on the quarantined email – Details, View Message, View Source, and Options.

All images are blocked in review to prevent possible inappropriate content. If a message is subsequently released and delivered then the original images will be present.
Release Message
On a rare occasion, an email in quarantine may have been incorrectly identified as spam. This is known as a ‘false positive’. To release a message, click the checkbox to the left of the email address and click the Release button. This will automatically forward the email to the recipient.
Allow a Sender
To add the email address of an email in quarantine to your Allow List, click the checkbox to the left of the email address and click the Allow button. The email address then is added to the email recipients allow list and the email is released from quarantine and delivered to the recipient.
Delete Message
To delete a message, click the checkbox to the left of the email address and click the Delete button. Delete multiple messages at the same time by selecting several email addresses at once before clicking Delete.
Change User Password

Your email credentials are synced with the filter so you will not be able to change your password from the filter.
Two factor authentication
Two-factor authentication (2FA) is an additional layer of security used to protect your mail filter account from unauthorized access. If 2FA is enabled, a user provides their username and password on login and then must also provide an additional piece of information known only to them. This additional piece of information is a one-time password, regenerated every thirty seconds.
Go to Settings > User Management > Two-Factor Authentication (2FA) to manage 2FA settings.

Follow the steps below to set up two-factor authentication:
1. Before continuing, you must download and install an authenticator phone app, e.g., Google Authenticator or FreeOTP.
2. Scan the QR code using the authenticator app installed in step 1. If you are unable to scan the QR code, manually enter the OTP (One Time Password) secret provided in the OTP Secret: field.

3. In the Code: field, enter the code generated from the authenticator phone app.
4. Click Register.
Recovery Codes
A set of recovery codes are generated when 2FA is enabled. Store these codes carefully as they are the only way to access your mail filter account if the device you registered 2FA on is lost.
The recovery codes are one-time use, and they must be used in sequential order.
Quarantine Report Settings
This page allows you to manage the language, frequency, and content of your own Quarantine Report.

Spam Quarantine Report
A quarantine report contains a list of emails that have been caught and quarantined. Users can directly manage their quarantined mail through these reports, which are emailed to them on a periodic basis.
A quarantine report provides links for a user to manage their quarantined emails directly from the report. See a sample quarantine report below.

User Block List
Go to Filter Rules > User Block List to manage block list entries.

If you Block an address or domain, then mail from that address or domain to your account will be blocked before it reaches your inbox.
Adding a Block List Entry
- Go to Filter Rules > Block List > Blocked Email Addresses to add an email address to the block list or go to Filter Rules > Block List > Blocked Domains to add a domain.
- Click Add… and the Add window displays.
- Enter the Sender Email: in the form of user@example.com or Sender Domain: in the form of example.com.
- For a domain entry, check Include Subdomains: for subdomains to also be blocked.
- Enter any optional comments in the Comments: field.
- Click Save.
Deleting a Block List Entry
- To delete an individual email address or domain, click the delete icon in the Options column to the right of the listing. To delete multiple entries at once, check the box to the left of the listings you want to delete.
- Click Delete… under Blocked Email Addresses or Blocked Domains.
Importing Block List Entries
- Create a single text file containing the entries to import. Both email addresses and domains can be imported together from the same text file. The file must have one email address or domain (preceded by the ‘@’ sign) per line. For example:
- john@example.com
- @example.com
- Click Import… and select the text file to import. Click Open.
- Email addresses will be imported to the Blocked Email Addresses and domains will be imported to the Blocked Domains.
User Allow List
No spam checking is performed for domains or email addresses that are added to an allow list, they are automatically forwarded to the recipient.
Go to Filter Rules > Allow List to manage allow list entries.

If you Allow a particular email address or domain then all mail from that user, or that domain to your account will be passed through by the Spam Filter with no questions – even if the message were recognized as spam. In effect it will bypass the spam filters.
Adding an Allow List Entry
- Go to Filter Rules > Allow List > Allowed Email Addresses to add an email address to the allow list or go to Filter Rules > Allow List > Allowed Domains to add a domain.
- Enter a Sender Email: in the form of user@example.com or Sender Domain: in the form of example.com.
- Enter Comments: as required.
- Click Save.
Deleting an Allow List Entry
- To delete an individual email address or domain, click the icon in the Options column to the right of the listing. To delete multiple entries at once, check the box to the left of the listings you want to delete.
- Click Delete… under Allowed Email Addresses or Allowed Domains.
Importing Allow List Entries
- Create a single text file with all the entries to import. Both email addresses and domains can be imported together from the same text file. The file must have one email address or domain (preceded by the ‘@’ sign) per line. For example:
- john@example.com
- @example.com
- Click Import… to select the text file. Click Open.
Geoblocking
Geoblocking restricts email based on a sender’s geographic location, which is identified by the sending server’s IP address.
Geoblocking is off by default to turn it on click “Enable.”
Go to Filter Rules > Geoblocking and follow the steps below to add a geoblocking rule for a country.

- Click Enable to turn Policy Based Geoblocking: ON (default: disabled).
- Click Add… and the Add Geoblocking Rule window displays.
- Country: Select a country to allow or block. This field auto-populates as you type.
- Status: Select Allow or Block to allow/block the country you selected.
- Comment: Enter an optional description of this geoblocking rule.
- Click Save to save this geoblocking rule or cancel to discard.
Once a geoblocking rule has been added, it can be edited or deleted. Click the edit icon to edit a rule or click the delete icon to delete a rule.
Mail History
The mail filter keeps a record of all mail that it processes. This information is available in Reporting > History.
Click the Refresh button to refresh the history list.
To view mail history by date, click the Date Range button and select from the list of available options. Choose Custom Date range… to set your own date range.

History contains the following information about each email. Click an email in the list to show more.
If a message type is clean this mail can be redelivered to the user’s mailbox for a period of 30 days. This will allow the user to “restore” an email they have deleted from their inbox.
Details

- Date: date and time the email was received.
- Msg ID: a unique internal message identification number that the mail filter assigns to each email (also known as SpamTitan ID). Click to view extended details on an email:
- Client Address: source IP address a mail was received from.
- Type: message type as classified by the mail filter, e.g., Clean, Spam, RBL Reject, SPF Reject, etc.
- From: sender email address.
- To: recipient email address.
- Subject: subject header of the received message.
- Size: size of the message.
- Flow: The direction of the message (Inbound, Outbound or Internal).
- TLS: indicates if TLS (Transport Layer Security) was applied to the message.
- Delivery: Indicates the delivery status of a message (Sent/Deferred/Bounced).
- Delivery Response: This shows the SMTP response from the destination server. This can be useful to indicate, for example, why a remote server rejected a message.
View Message
This will show the contents of the email.

View Source
This shows specific header information for the email. (Useful for troubleshooting mail issues).

Options

- Release: Delivers the mail to the inbox, mail can be redelivered to the user’s mailbox for a period of 30 days.
- Allow: Adds the email sender to you allow list and delivers the mail to the inbox.
- Delete: Removes the message from the filter.
- Mark message as spam: Marks the message in the filter as spam.
Strong Passphrase
People with weak passwords often fall prey to hackers and spammers who look to exploit security holes in computer systems. A weak password on an e-mail account can easily be cracked by a hacker, who can in turn use the account for nefarious purposes such as spamming and identity theft.
A weak password on a Web site can lead to on-line “graffiti”… a situation in which a hacker accesses the Web space and defaces the site. Also, hackers can access sites and plant worms, trojans, and other forms of malware that can infect the computers of people visiting the site.
A truly strong password or passphrase should be at least fifteen characters in length, and it should consist of a mixture of numbers, letters (both upper and lowercase), and symbols. A good password should also be something that can be remembered. A password or passphrase that is written on a sticky note and pasted to a monitor is a security risk. Spend some time thinking about your password or passphrase
How do I configure a router?
Alliance’s High-Speed Internet over Fiber Optics service will allow you to connect to the Internet through most routers, without the need for configuration changes. Alliance uses DHCP as the method of connecting its customers, so all necessary IP settings are assigned to your router automatically.
Although there is no configuration needed to connect to the Internet, different routers have different security features. Alliance recommends that you change the management password on your router to something other than the default. Wireless routers also offer a number of security options. To enable these options, please consult the documentation that came with your router.
Internet and cable out?
If you discover that both your Alliance cable and fiber Internet services are not working, this usually indicates a problem with your uninterruptible power supply, or UPS. The UPS is a white box labeled CyberPower, and it is usually located in the room where your utilities come into your house. This box contains a battery that provides power for your telephone service in the event of a power outage, and it is plugged into a standard 110 volt wall outlet.
Check to make sure that the green light labeled AC is lit on the CyberPower UPS. If not, the battery is no longer being charged, and the fiber equipment has disabled all services except telephone to conserve energy. If the green AC light is out, check the outlet to see if the power cord is plugged in. If the UPS power cord is plugged in, check the outlet for GFI buttons. If this outlet is equipped with a GFI, there will be two buttons, one labeled test and another labeled reset, located in the middle of the outlet. Push the reset button to restore power to the outlet. This should cause the AC light on the battery backup to come back on.
If following these instructions does not restore your service, call for more support by dialing 611 from any phone with Alliance service, or call 605-594-3411.
Internet out but cable is working?
- Verify that the power to the router is on, and that the router’s internet/WAN port is properly connected to our Internet service with a straight-through network cable.
- If you have a wireless router and you are connecting via a wireless network adapter, verify that you are getting a wireless connection to the router. If you are connected via the wireless adapter, there should be an icon in the system tray that shows the wireless network name (SSID) and signal strength. If your wireless icon does not have this information, your computer is not connecting to the wireless router. Connect with a network cable and try again.
- If your computer is plugged into the router with a network cable and it still cannot connect to the Internet, reboot the router and the computer and try again.
- If rebooting the router and PC does not solve the problem, check the IP address on the PC via the ipconfig command. To do this, follow these instructions:1. In Windows 10, click the Windows button, type cmd in the START SEARCH box, and press enter.2. In the black command prompt screen, type in the command ipconfig and press enter.3. If everything is working correctly, the network adapter labeled Local Area Connection should have an IP address of 192.168.x.x, 172.16.x.x, or 10.x.x.x (the x characters represent any number between 1-254).4. If the above steps do not resolve the problem. Remove the router and plug the computer directly into the fiber service. Reboot the computer.
Security on fiber networks?
Because a modem is no longer needed, your computer or router will have a public IP address. If you have a router, you should consider changing the management login/password to something other than the default. This will prevent malicious users from logging onto your router. Be sure to enable firewall services on your router.
If your router doesn’t have firewall services, you should consider purchasing a hardware or software firewall solution. If your PC is directly on the network (no router), you should have some sort of software firewall running. Windows 8 and 10 have a built-in software firewall, and there are many others that can be purchased separately.
End User Agreement and Privacy and Customer Security Policy
Network Management Policy
Alliance Communications commits to the open and non-discriminatory use of the Internet by its customers and commits to use reasonable network management practices to ensure an open Internet. Alliance Communications will manage its network and provide access in accordance with the Federal Communications Commission’s (FCC’s) Open Internet Rules (adopted December 21, 2010 in 25 FCC Rcd 17905) and in compliance with any future rules adopted by the FCC.
Transparency
Alliance Communications shall make available public information on its website (http://www.alliancecom.net) regarding its network management practices, performance and commercial terms of its service sufficient for consumers to make an informed choice regarding their use of such services.
Alliance Communications will not unjustly or unreasonably prevent or interfere with competition among Content, Applications, Service, or Device Providers.
Network Security and Congestion Management
Alliance Communications uses generally accepted technical measures to provide acceptable service levels to all customers, such as application-neutral bandwidth allocation, as well as measures to address service attacks, illegal content and other harmful activities to protect network integrity and reliability.
Alliance Communications reserves the right to prioritize traffic based on real time and non-real time applications during heavy congestion periods based on generally accepted technical measures. Alliance Communications may set speed thresholds on the amount of data you as a customer can upload and download within stated time periods. If you exceed these thresholds, Alliance Communications may temporarily limit the speed at which you can send and receive data over the Alliance Communications access network. Alliance Communications may use other traffic management and prioritization tools to help ensure equitable access to the Alliance Communications network for all customers.
Alliance Communications monitors customer usage to efficiently manage the performance of the network to ensure a sustainable quality broadband service is provided.
Congestion due to malfunctioning hardware and/or software will be remedied as quickly as network engineers can diagnose and identify the offending hardware / software.
Congestion due to malice will be remedied using any technique available, including protocol-aware filtering and rate-limiting, to control and limit the offending source. Alliance Communications may seek criminal charges against those who inflict network malice. Alliance Communications may also attempt to recover costs incurred from network malice.
It is not acceptable to use the Alliance Communications network for any purpose that violates local, state or federal laws or to transmit communications that might be highly offensive or damaging to any recipients or to use the service in a manner that is unintended. It is not acceptable to interfere with, violate, circumvent, misuse, distribute or disrupt network users, equipment or services, which include but are not limited to:
- Attempting to obtain unauthorized access to any network or account. This includes accessing data not intended for end-user customers, logging into a server or account without being expressly authorized to access or probing the security of other networks.
- Attempts to interfere with the Service of others including users, hosts and networks. This includes “denial of service” attacks, “flooding” of networks, deliberate attempts to overload a Service and attempts to “crash” any host.
- Reselling any Alliance Communications Internet Services, without Alliance Communications’ written consent.
- Distribution of Alliance Communications Internet Services beyond the scope of your end-user account.
- Equipment, accessory, apparatus, circuit or devices that are harmful to the network, shall not be attached to or connected with Alliance Communications facilities.
- Circumventing copyright laws and regulation, including the unauthorized download of music, video, images, books, software or content and/or other copyright protected works.
Alliance Communications offers spam filtering as an add-on service to each of our customer’s email addresses. Details of this service are listed on Alliance Communications’ website. Alliance Communications will not ask you for your password in an unsolicited telephone call or email. If you believe your password has been compromised, you should immediately change your password to prevent the unauthorized use of it.
Blocking
Alliance Communications shall not unjustly or unreasonably block access to lawful content, applications, services or non-harmful devices, subject to reasonable network management.
Discrimination
Alliance Communications shall not unreasonably discriminate in transmitting lawful network traffic over a consumer’s broadband Internet access service, subject to reasonable network management practices.
Commercial Pricing
Please click on the following website link for pricing information including monthly prices, usage-based fees, and fees for early termination or additional network services: www.alliancecom.net
Contact Information
If you have any questions regarding this policy, dial 611 from any phone with Alliance service or call 605-594-3411.
Do We Sell Network Equipment?
Alliance doesn’t sell equipment, however, we do lease routers and wireless mesh units.
Set up Browser's home page?
Your home page can be your own web site, your favorite search engine or portal. Many customers use Starting Points as their home page because it provides quick access to local and national web sites. If you do not use this web site as your home page, we recommend that you bookmark it so you can easily access customer updates, policy statements and other valuable information.
Internet Explorer:
- Double-click on the Internet Explorer icon to open the browser window.
- In the address line, type the address of the page you would like to have as your home page, and press Enter. (Example: www.alliancecom.net/starting-points)
- Click on Tools. Then click on Internet Options.
- On the General tab, click on the Use Current button.
- The URL for the page you went to will appear in the box next to Address.
- Click OK to go back to your web page.
Firefox:
- Double-click on the Firefox icon to open the browser window.
- In the address line, type the address of the page you would like to have as your home page, and press Enter. (Example: www.alliancecom.net/starting-points)
- Click on Tools. Then click on Options.
- On the Main tab, click on the Use Current Pages button.
- The URL for the page you went to will appear in the box next to Home Page.
- Click OK to go back to your web page.
How do I get a domain name?
To get a domain name, you must first go to the website of a domain name registrar such as GoDaddy or Network Solutions. Once there, you must use their search tool (usually located on the front page of the site) to determine if your desired domain name is available. If the domain name is available, you will be given the option to purchase it with a credit card. Domain names can be purchased on a yearly basis, or you can purchase them for a number of years. Depending on your needs, it may be wiser to purchase the domain name for a number of years, as most registrars offer price breaks for doing so.
Once you have purchased the domain name, the registrar company will send you an email with an account name and password. Keep this information in a secure location, as you will need it when it comes time to renew the domain name. You will also need this information so that you can point your domain name to the Alliance Communications DNS servers.
When you have received your account information from your registrar, you will need to log into that company’s Web site and change the DNS for your domain name so that, rather than using the registrar’s parked servers, they will instead point to the Alliance DNS servers. The addresses to use for this are ns1.alliancecom.net and ns2.alliancecom.net. Once this has been done, you simply need to contact us and let us know that you are ready for us to host your domain name. While doing this, keep in mind that DNS changes typically take 24-48 hours to propagate throughout the Internet.
Please note that you will incur a $11.95 monthly charge when hosting a domain name with Alliance Communications. Please contact us for more pricing information or for further assistance.
What is DNS?
DNS stands for Domain Name System. In the early days of the Internet, back when it was controlled by the Defense Advanced Research Projects Agency (DARPA), traversing the net was made possible by a manually-updated list of server names and IP addresses. When people wanted to access a server, they needed to consult this list for the appropriate server name or IP address. As this fledgling mesh of networks rapidly grew, it became apparent that the “telephone book method” of managing server name/IP address translations was unfeasible. As a result, DNS was born.
In the 1980s, control of the Internet was transferred from DARPA to the National Science Foundation (NSF), and development and refinement of DNS continued. In 1992, Congress granted NSF the right to commercialize the Internet, and the World Wide Web as we know it was born. Thanks to DNS, it was possible for companies to assign easily-remembered names like www.google.com to Web services. If it were not for the development of DNS, today’s Internet would not exist.
Browsing the Web has become as common-place as making a phone call. We open up our browser of choice and we go to the Web page that we want to visit. Although this appears to be a simple task that is completed solely by your computer, it is actually a four-step process involving your computer, a DNS server, and the Web server that is hosting the Web page.
For example, when you enter http://www.alliancecom.net into the address bar of your browser and press ENTER, that information is sent across the Internet to your ISP’s DNS server, where it is translated into the IP address of the Web server hosting that page (66.115.210.3). The DNS server then sends that IP address back to the computer, allowing the browser to connect to the Web server. The Web server then processes your request for the Web page and sends the appropriate content to your browser. Voila! Your computer displays the requested Web page in the blink of an eye.
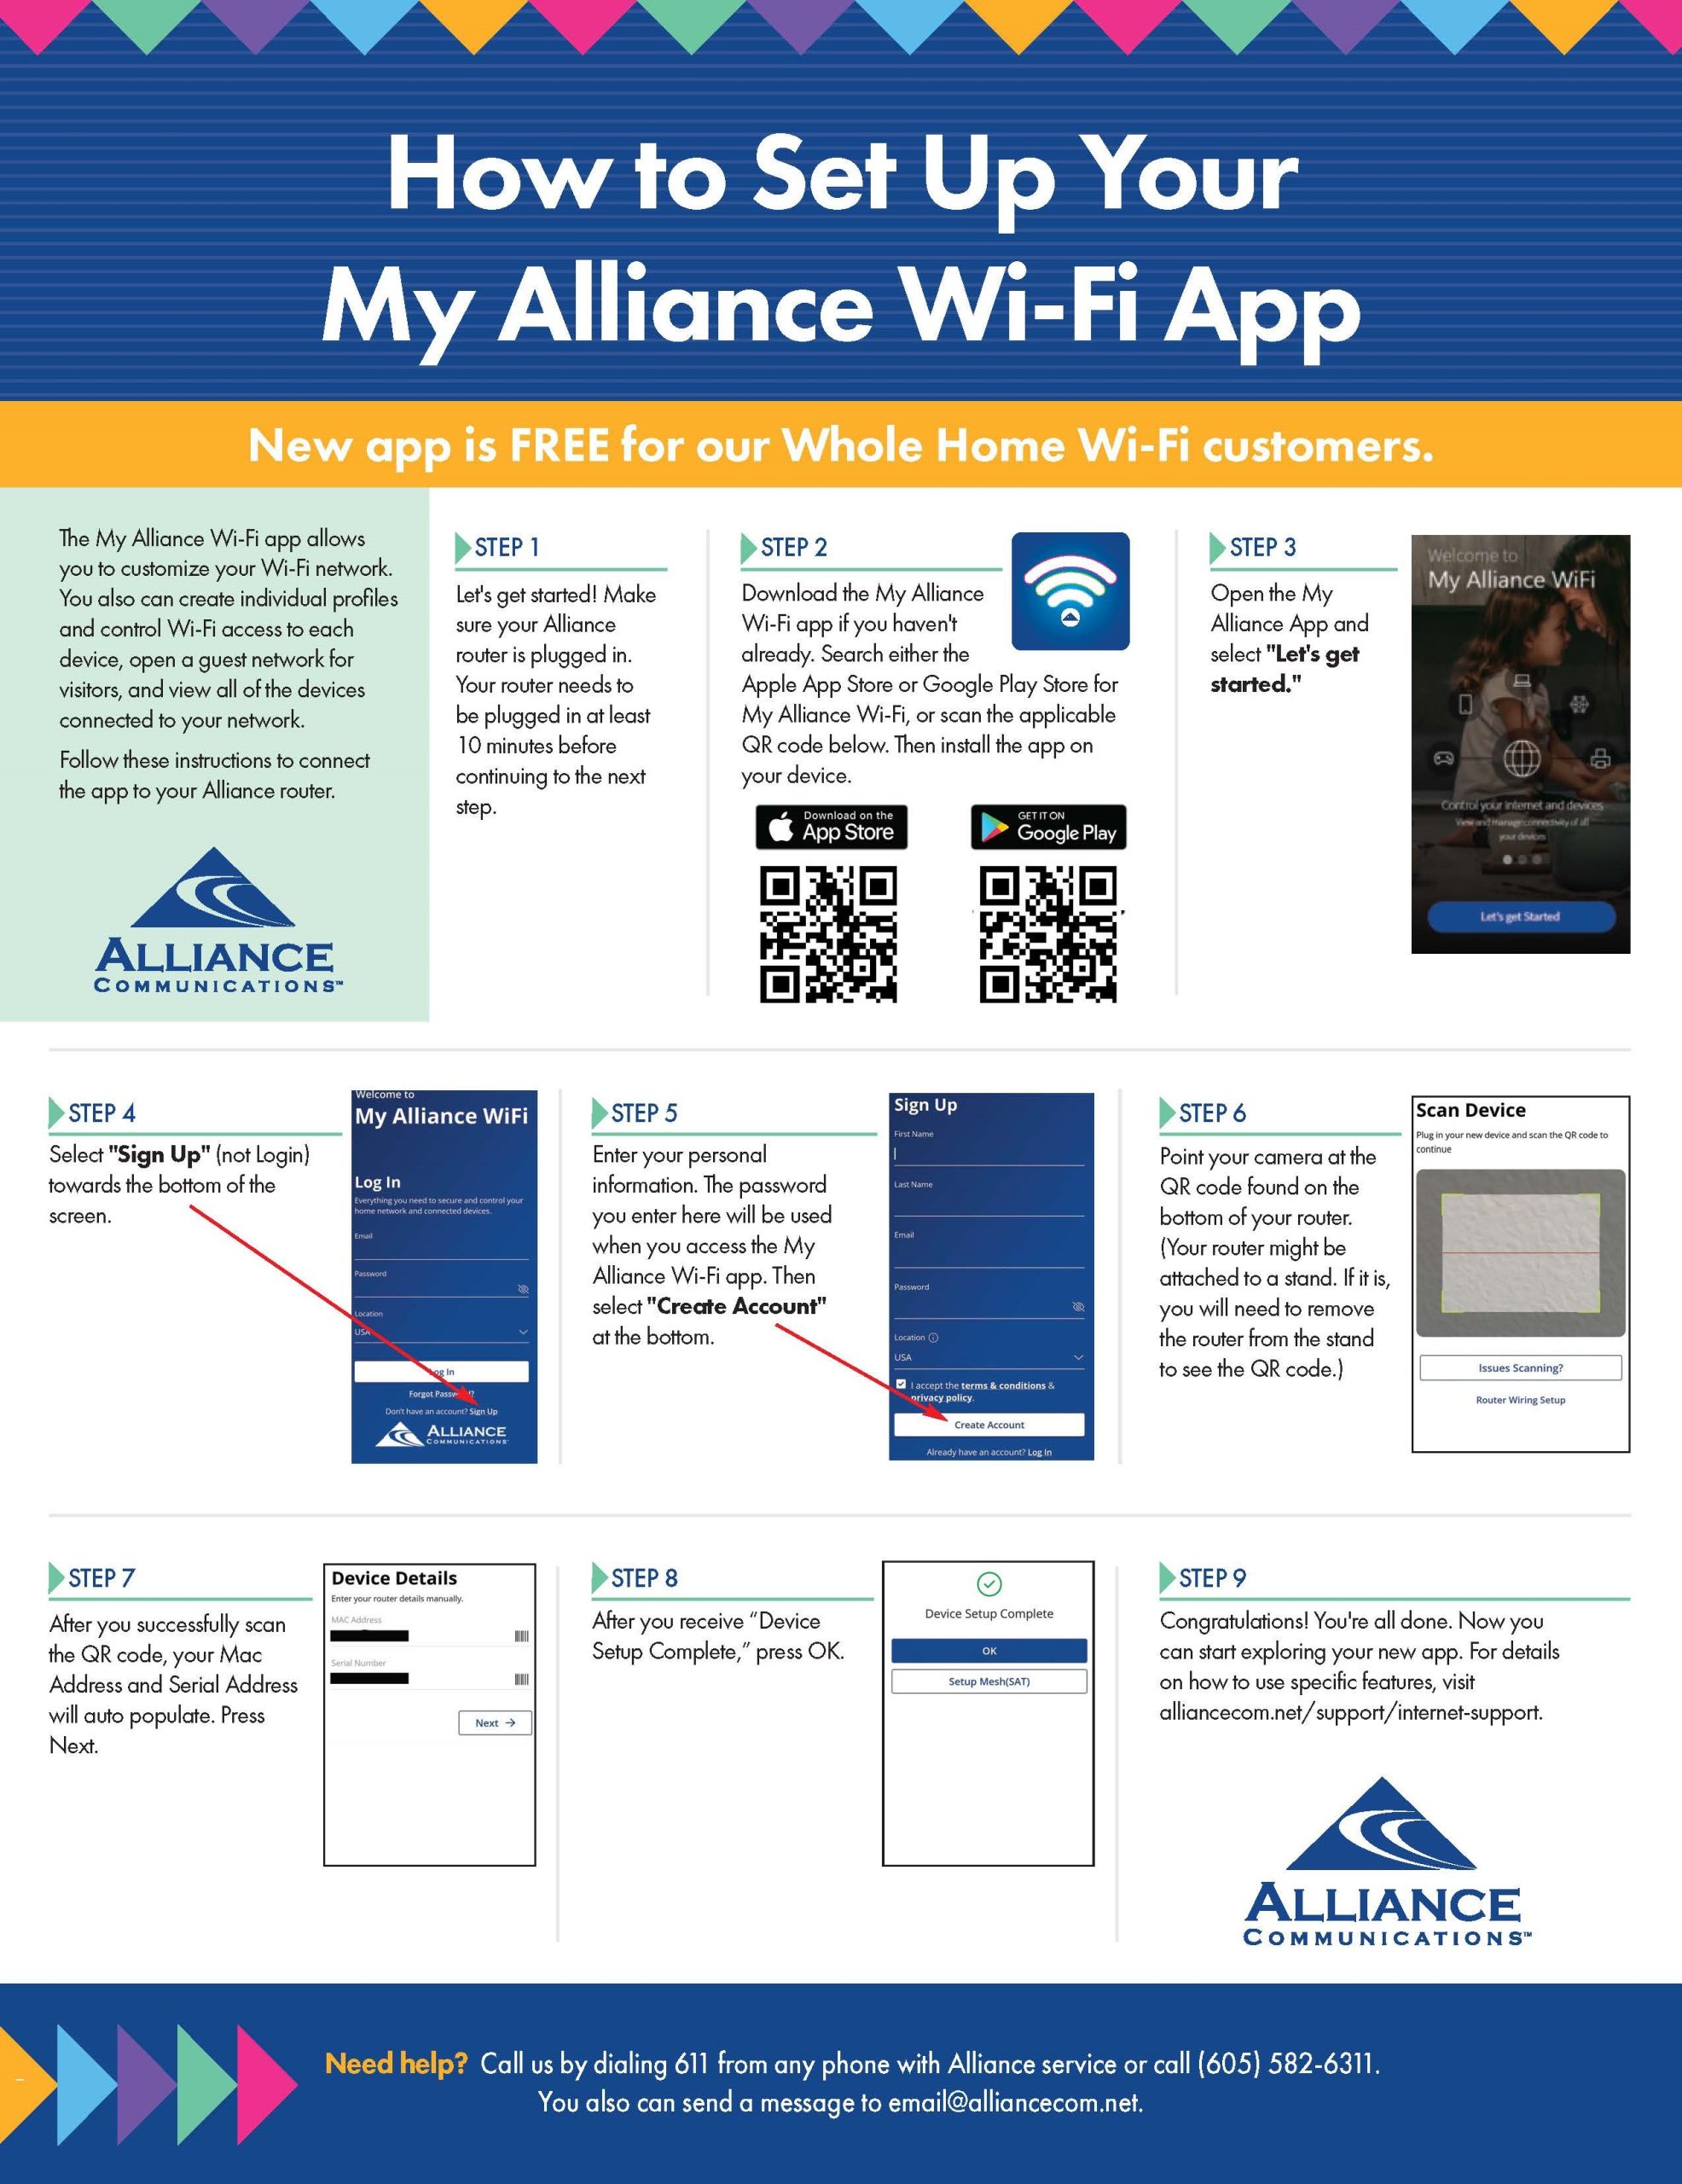
Setting Up Your Wi-Fi and App
Main Dashboard of My Alliance WiFi App
An introduction to the Main Dashboard of your My Alliance WiFi App. Creating and controlling the ultimate Wi-Fi experience happens from right here.
Getting to Know People, Places and Things
People, Places and Things are at the heart of your home. That’s why the My Alliance WiFi app is built around these three key features. In a few easy steps, you’ll be able to tailor your connected experiences and quickly navigate into the most important settings of your Wi-Fi.
Change Network Name and Password
Securing your Wi-Fi provides peace-of-mind in keeping others from using your network. You don’t want to leave your SSID or password with the default settings.
Perform Bandwidth Test
Performing a speed and latency test on your network can be done directly from the app.
View Connected Devices in Your Network
To ensure your network doesn’t become compromised, you should know exactly what devices are connected to it.
Basic Parental Controls Set Up
Set profiles and assign devices to profiles for basic on/off control. This works great for dinner or bedtimes.
Guest Network Set Up
There may be times when you have guests in your home who need to access your WiFi network. The app has a simple guest WiFi feature, so you can give them access without sharing your primary WiFi information.
Sharing your Guest Network
Alexa Set Up to work with your Alliance router
Your Alliance Giga Blast WiFi 6 Router can connect with Amazon Alexa. Setting it up is a simple process.
Learn how to set up enhanced parental control profiles
Experience IQ Parental Controls: Add Content Restrictions
Using the Restrictions feature within Experience IQ can help you control the type of content a person can access on the internet. My Alliance WiFi App users who subscribe to Ultimate Whole Home WiFi have access to Experience IQ content restrictions.
Experience IQ Parental Controls: Alerts
Experience IQ Enhanced Parental Controls can help you create boundaries for device use in your home. With this feature you can receive updates about profiles and devices you’ve chosen to monitor.
Experience IQ Parental Controls: My Priorities Set Up
Wish you could prioritize your devices or activity traffic for the best Wi-Fi performance? Now you can! My Priorities, part of Experience IQ in the My Alliance WiFi App, allows you to optimize your Wi-Fi for work, gaming, streaming and so much more!
Experience IQ Parental Controls: View Usage
Learn how to view usage in Experience IQ Parental Controls within the My Alliance WiFi App.
Experience IQ Enable and Disable Apps
Setting up a Mesh satellite with the app
How to Set Up Your Mesh Wired
Connect Wired Devices to Your Alliance Router
Connecting wired devices to your router doesn’t get any easier than this.
All-inclusive security programs?
Yes. Several are available to help protect you from a variety of online threats. Please conduct your own research to find the program that’s right for you.
Do I need security programs?
It’s only a matter of time before you run into trouble if you don’t protect your computer.
Block inappropriate material?
Internet safety is a rapidly growing concern. Families depend on the Internet, but parents must maintain an appropriate environment for their children.
Below are links to some well-known filtering programs:
ContentProtect www.contentwatch.com
CYBERsitter www.cybersitter.com
Net Nanny www.netnanny.com
Norton Internet Security at www.symantec.com and McAfee Internet Security Suite at www.mcafee.com offer parental controls plus ad blocker, anti-virus, privacy control, anti-spam and firewall features all in one program.
Please be aware that children and teenagers can easily access pornography through free file-sharing programs. Content filters typically don’t block items accessed through file-sharing programs. Make sure your children haven’t downloaded file-sharing programs onto your computer.
Remember, there is no replacement for Internet safety rules within the home.
PC/MAC Support
Please go to sos.splashtop.com and download the file for your system. Once the file is downloaded, please run the downloaded file and call our office at (605)594-3411 or x611 from your Alliance phone. You can also click here and be redirected to the website.
Provide the 9 digit number that pops up after downloading the splashtop file. For further assistance, please call our office. Thank you.
Run a Speed Test Using Your Computer
Disclaimer: Browsers (Chrome, Firefox, Edge, Safari, etc.) have different capabilities and may provide different results, particularly on high-speed connections. Using the Speed Test app instead of speed test websites usually provides more reliable results.
Run a Speed Test Using an Apple Device
Run a Speed Test Using an Android Device